
We are living in an era of interconnected systems, and there are better ways to provide a complete solution to a technical challenge than inventing everything from scratch or coming up with a mega app to control all the things.
Instead, the key is to connect with other products that are really good at solving a specific problem.
Today I would like to discuss a way to improve customer/user engagement using already existing transactional systems. Most companies have an internal system to handle clients and users. This type of system often falls outside of the scope of marketing campaigns, mostly because we usually fail to recognize its potential as a way to interact with their users.
Challenging the boring welcome email
Let’s imagine we have a system in which we store information about new customers that engage with our platform. Perhaps this information is collected by phone or email and then entered into our system. This type of enrollment usually ends up with a plain text email (with an emphasis on “plain”) that gets sent to the user along with login credentials.
Up until here, nothing seems wrong, at least at a first glance. But on closer inspection, maybe this standardized and widely accepted process is wrong since these emails are often ignored and offer little help in start building the relationship with our customer.
A proposal
We could transform a tedious and boring two-step enrollment process that ends with a bland registration email, into a single-step action that results in an automatic and customized email with meaningful information, and that is already part of a marketing campaign.
The idea is to include an extra internal step to subscribe any new customer to a MailChimp list. The subscription will automatically start a campaign that sends a warm welcome email to our customer, and will also allow us to stay in contact with that person via email to notify and provide them with new relevant information.
Naturally, the whole process requires that the customer knows whether he will be automatically subscribed to a mail list or just receive a one-time email, depending on each company’s terms and conditions.
The implementation
In this example, we will look at an implementation based in Node.js, since this is one of the favorite environments for startups to create new applications. So let’s imagine that our company ACME is a new startup that is expanding their homemade CRM to reflect their mojo, and chooses Node.js for this project to maintain its “hip startup” standard.
Besides all the hype, one thing that is really cool about Node.js is that you can execute it in three different environments:
-
Script: We could create a shell command [application] and use multiple plugins to deploy a solution that gets executed on our machines or on a server, in order to automate tasks that will respond to specific parameters.
-
Client Site: The most widespread notion of Node.js, which is an advanced Javascript application that provides a way to interact with our app via browser, and is capable of triggering an action in our backend server or in third-party services like MailChimp.
-
Server Side: Probably the least common way to think about Node.js, especially for people that are taking their first steps within the Node.js ecosystem. You could argue that at the end of the day “it’s all just Javascript” (and you would actually be correct), but the truth is that Node.js has the potential to be used as the “New backend for our frontend”. It is fully capable of executing tasks on the server, such as operations that involve credentials or access to critical services that must be maintained behind the scenes.
Regardless of the environment, you select as the best fit for your implementation, the code will always be the same. It is up to you to decide which one best fulfills your security requirements and the desired interconnection with your architecture.
Show me the code
In this example, we are going to use the package mailchimp-api-v3.
MailChimp Requirements
API Credentials
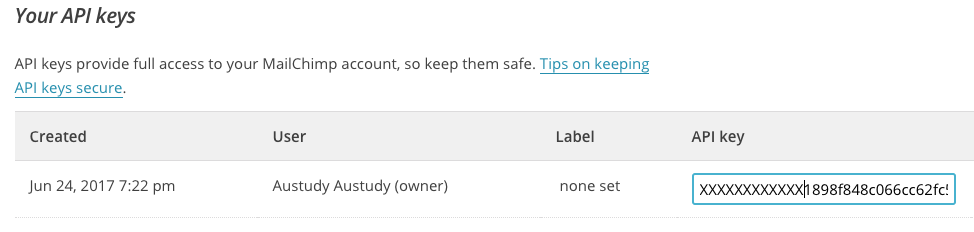
To communicate with our MailChimp via the MailChimp API, first, we need to go to our profile page and get the API Keys.
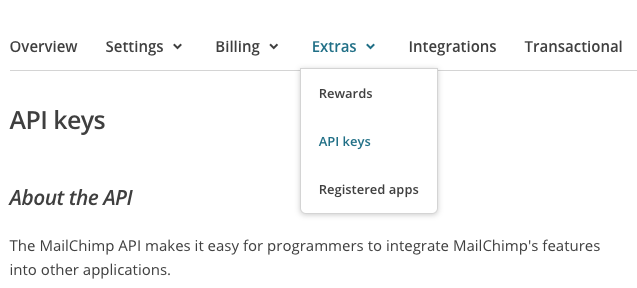
On this page, you will be able to get the API Key required to perform actions via the MailChimp API.
Mail List ID
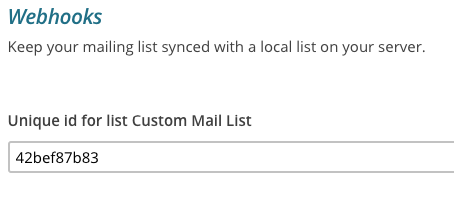
Next, we need the internal ID for the specific mail list that we want to use. You can find this value inside the list settings page, as shown below. Beware of a caveat: the ID in the URL is not the ID required by the API.
Campaign
For our example, I will use merge fields inside a MailChimp List. These are custom fields that you can use to store information about your mail list subscribers, such as age, gender, birth date, etc. In this case, I just created a hidden field named “Call to Action” which I will use to define a segment that will allow us to trigger a campaign or not.
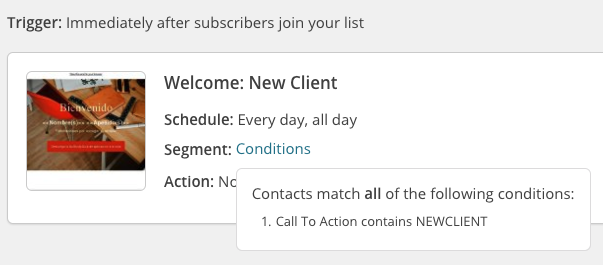
You can see below how I declared a new segment called NEWCLIENT, which will contain all subscriptions that include the text NEWCLIENT in the “Call to Action” merge field.
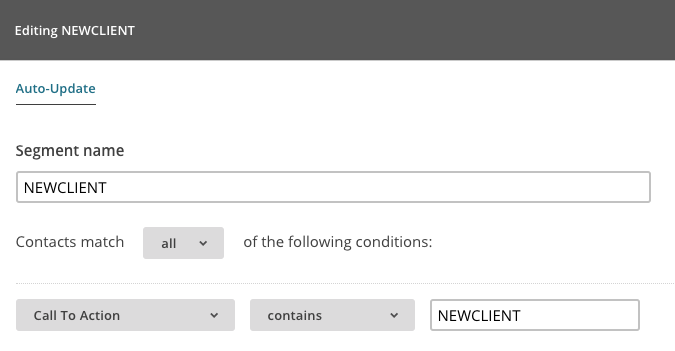
Later on, when I create a campaign for my Welcome Email, this campaign will get started for all new subscribers that belong to the segment NEWCLIENT. That means that as soon as I insert a new subscriber via the API with the merge field “Call to Action” equaling to NEWCLIENT, the Welcome Email will be sent as quickly as possible.
Let’s take a look at the admin dashboard featuring a segment and trigger for my Welcome Email campaign.
Piecing it all together
First, we need to load the npm package and set it up with our custom API Key; the code assumes the api_key variable contains the MailChimp API Key.
var Mailchimp = require('mailchimp-api-v3');

var mailchimp = new Mailchimp(api_key);
Now we need to decide under which circumstances this action will get triggered. For instance, let’s say that in the app we get a drop down, and a variable status has the field we will use to dispatch our process. Inside this condition, we will first check via API if the list exists.
The variable list_id contains the List Id
if(status.name == 'Welcome') {
    //Validate if the list exists.
    mailchimp.get({
        path: '/lists/' + list_id
    }).then(function (result) {
        // Confirmed, do something
}).catch(function (err) {
    // Wrong list, do something
})
If the code above looks a little weird, it’s because the library uses asynchronous calls via Promises.
Promises allow us to perform a chain of actions. In this case, we have a “Then” chain, which means that if everything goes well we could execute an action and if something fails we could still use “Catch” to provide an alternative option in our workflow.
The good thing about Promises is that we could use “Promises within Promises”. For example, if the list exists, now we could validate whether the email we want to subscribe to the list is already a member.
The variable “Email” contains the email we want to subscribe, and we use the package md5 to create a hash to validate against the MailChimp API.
//Validate if email already exists
let emailHash = md5(email);
mailchimp.get({
    path: '/lists/' +list_id + '/members/' + emailHash
}).then(function (result) {
// Member, do something
}).catch(function (err) {
// Not Member, do somehing
});
At the end, to subscribe a new user we do another call to the MailChimp API.
//Subscribe new email to list with proper merge fields
mailchimp.post('/lists/' + list_id + '/members', {
    email_address: email,
    status: 'subscribed',
    merge_fields: {
        'CTA': 'NEWCLIENT',
        'FNAME': firstName,
        'LNAME': lastName,
        'BIRTHDAY': '',
    }
}).then(function (results) {
    //console.log('Subscription works');
}).catch(function (err) {
        //console.log('Subscription fail');
        console.log(err);
 });
The important thing here is the merge_fields option; we need to provide the proper values so that the campaign can trigger the automatic email.
After completing this process, our enrollment procedure will have a more advanced level of automation, plus you can give a boost to your relationship with your end customer.
Have fun with your email marketing campaigns!